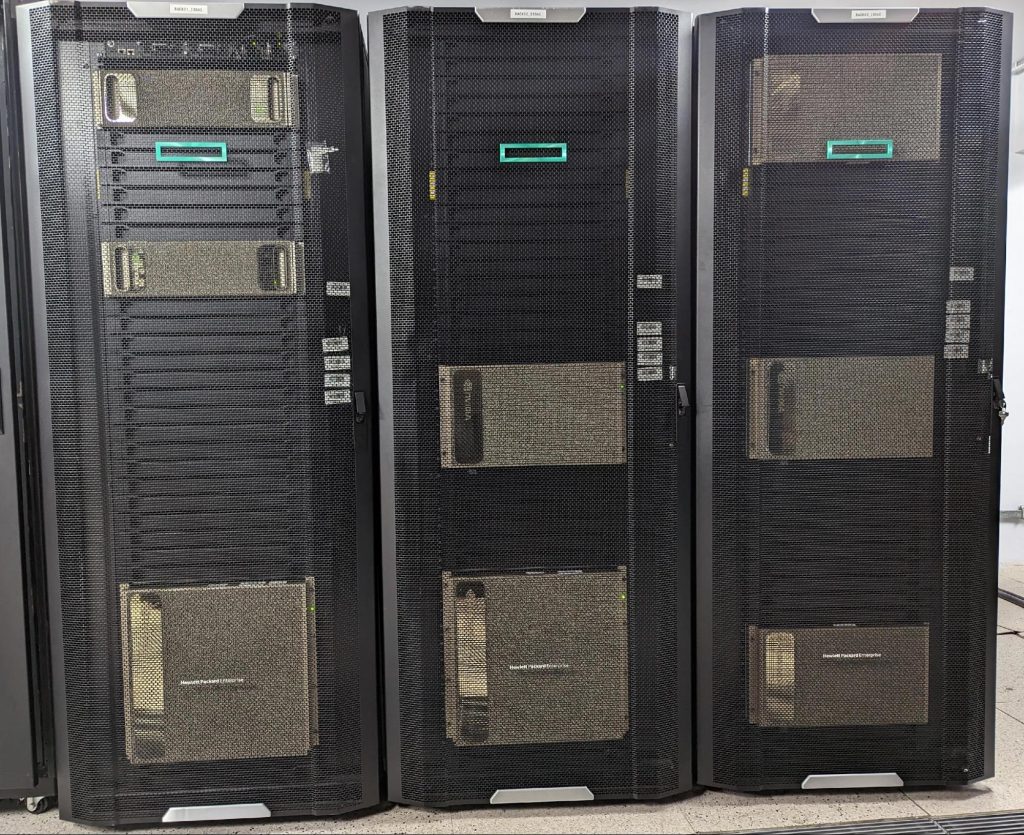
Our AI Computing cluster consists of many interconnected computing elements (nodes). The nodes in each cluster operate in parallel with each other, reaching higher processing power to train deep learning models. The current AI computing resources at ISSAI consist of 7 computing nodes:
We are committed to share our know-how and resources with the Kazakhstani research community. Here, we provide information on how to interact with us to use these resources.
To obtain access credentials, please fill in the application form. After you submit the completed application, ISSAI will review it and contact you to inform you of the following steps. You will need to sign a user agreement.
Information on general principles that should be followed when working with ISSAI AI Computing resources and information on technical support.
HARDWARE SPECIFICATIONS OF THE ISSAI AI COMPUTING RESOURCES
Information on the system parameters, the access network, the ISSAI computing cluster, data storage, and node names and parameters.
SOFTWARE SPECIFICATIONS OF THE ISSAI AI COMPUTING RESOURCES
Information on the software installed on the AI Computing cluster.
Information on the command line, the graphical interface of the software, and the web interface.
GETTING STARTED WITH THE ISSAI AI COMPUTING RESOURCES
Information on connecting to the cluster, the user workspace, copying files, and using software modules.
Information on requesting graphics processing units (GPUs) for a task and developing with the CUDA Toolkit – preparing the working environment, usage examples for the cluster, and GPU code generation options.
To obtain access credentials, please complete the application form. After you submit the completed application, ISSAI will review it and contact you to inform you of the following steps. You will need to sign a user agreement.
The terms of use are available online here: Terms of Use.
The maximum execution time for a task is two weeks. After this period, the task is automatically canceled. If more time is needed, the user can make a separate user form with the ISSAI administration.
If a task requires intensive disk operations, it is advised to use a local SSD hard disk instead of the network directory (/home/* or /raid/*). The local hard disk is mounted in the /scratch directory. When the task is complete, a user should manually remove the files created in this directory.
Technical support is provided to all AI Computing cluster users. The support includes help with task preparation, application software installation, instruction on how to work with the cluster, and advice.
We can also explore the possibility of providing scientific support by helping you to select the most appropriate simulation tool for your problem or to create a simulation model.
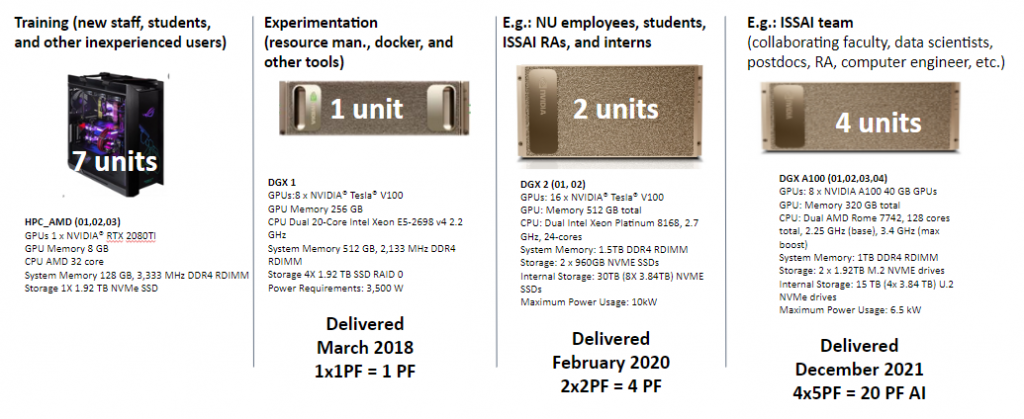
The ISSAI AI Computing resources consist of 7 computing nodes for task execution and one head node that performs the cluster management function. All nodes are interconnected via a fast InfiniBand network. Each computing node is equipped with two x86_64 architecture central processing units (CPUs) and some of the nodes are additionally equipped with 2 or 4 Nvidia Tesla GPUs. The cluster architecture is heterogeneous and combines nodes of different generations and technical parameters.
Several network-attached storage systems are available for storing user data. For tasks with intensive I/O, a dedicated NVMe disk array with an NFS file system is available.
7 computing nodes
1296 CPU cores
6.7 TB RAM
72 Graphical Nvidia Volta, Tesla processors (GPU)
145 TFlops overall performance (25 Tflops GPU)
124 TB data storage
This section provides an overview of the scientific software installed on the ISSAI AI Computing resources.
On request, the installation of additional software or other versions can be considered. The Centos, EPEL, and OpenHPC repositories are used on the cluster. Tools available via the OpenHPC repository can be found at: https://github.com/openhpc/ohpc/wiki/Component-List-v1.3.8.
Users can also install/compile the software themselves in their user area if the installation process does not require administrator (root) permissions.
Information on the command line and the web interface.
Several options are available for working with the cluster:
Command line. This is a traditional way of accessing the cluster. A user connects via the Internet to a remote terminal (usually via a secure shell (SSH) protocol) where commands can be executed in text mode. It is possible to edit and compile a code, queue a task (simulation), and monitor the progress of the execution of the task. Graphical tools can also be called from the command line. The instructions in this guide are mainly intended for access via the command line.
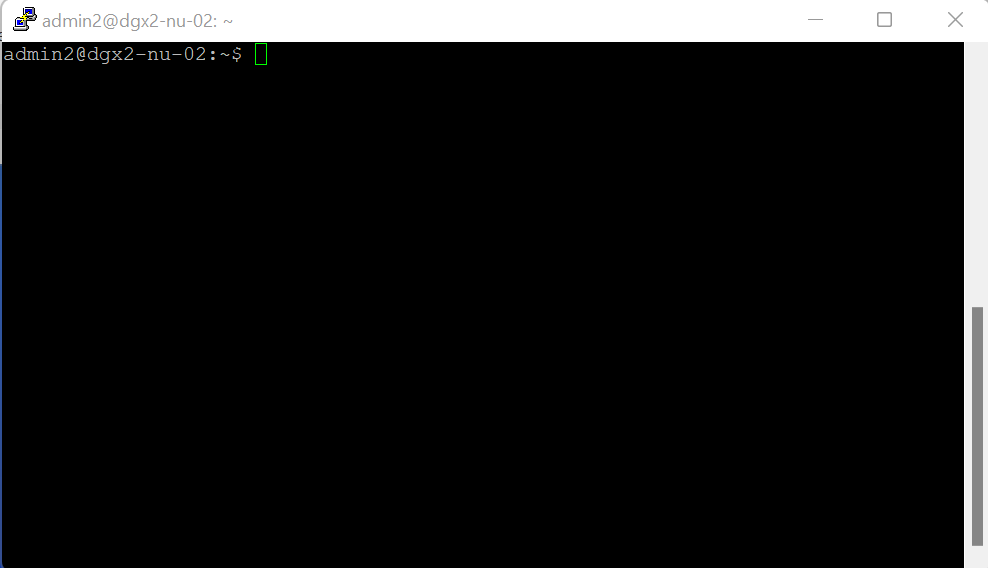
Working with the cluster is done through a dedicated server (login node) with the Ubuntu operating system and workload management tools installed. Once connected, the user can use the command line with Unix commands, and it is possible to edit and compile a code, submit a task (simulation) and monitor its execution on the computing resources. From the command line, the user can also invoke graphical tools/windows described later in this document.
We request the users not to use the login nodes for the resource-intensive operations. The login nodes are only for copying files to or from the cluster, preparing tasks, passing tasks to a queue, and monitoring the results. Testing a short (< 5 min.) task or compiling a code on a few CPU cores is acceptable. Also note that running codes or simulations on the login node (even opening a software GUI) does not automatically guarantee that the task will run on the computing nodes. For this, you must use the workload management tools described in the Job Management section.
Command-line access parameters:
The SSH connection can be established with the following tools:
You can connect to the ISSAI server using the SSH by opening the command line (terminal) and executing the following command:
if you have preconfigured the config file sent to you in the email with connection setup
ssh remote_serverExample of ~/.ssh/config file
Host issai_gateway
        HostName 87.255.216.119
        User user_name
        Port 11223
        IdentityFile ~/.ssh/id_rsa
        ForwardAgent yes

    Host remote_server
        HostName 10.10.25.12
        User user_name
        Port 22
        ProxyJump issai_gateway
        IdentityFile ~/.ssh/id_rsa
        ForwardAgent yes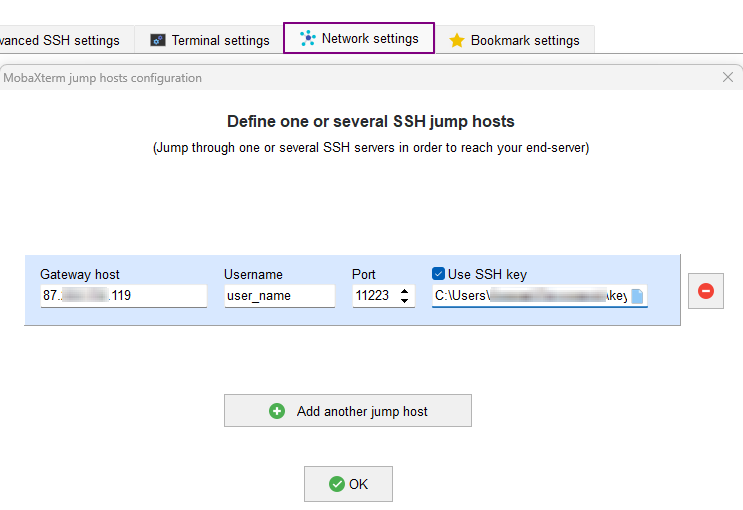
LocalForward 222 localhost:22Using the MobaXterm software, you can initialize a new ssh connection with the following settings:
Go to tab Advanced SSH settings and fill:
Remote host and Specify username fields with the data sent to you in the email with connection setup.
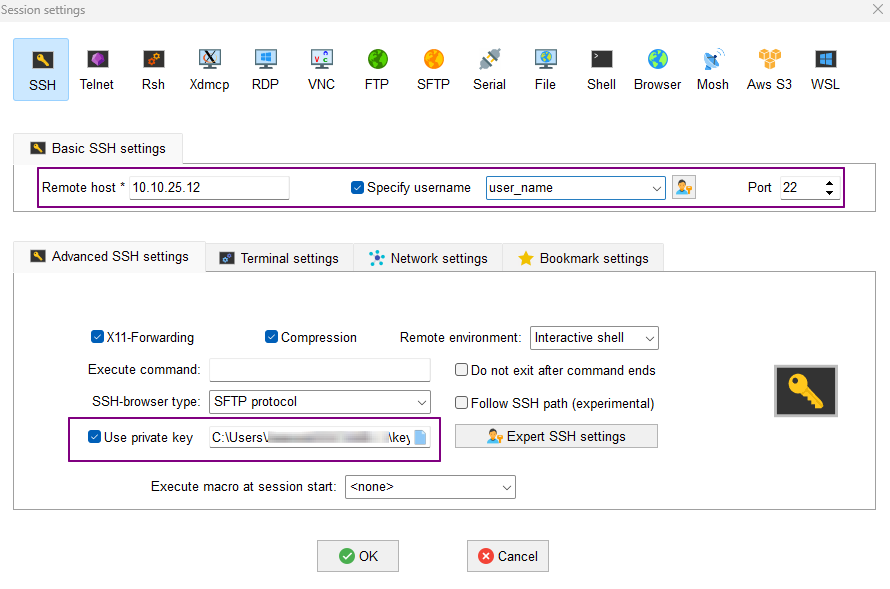
On the Network settings tab, add SSH gateway (jump host) by providing data from the email with the connection settings.
How to use graphical interface through command line?
If you use the server via an SSH client, you can use not only the command line terminal but also graphical user interfaces. SSH ensures X11 forwarding from the server to the user’s computer.
Use the -X parameter when connecting to the server in a Linux environment.
ssh -X remote_serverEach user has a prepared workspace where they can store files related to their tasks. When the user logs into the system using command line, they are automatically directed to the home directory.
/home/user_nameHow to transfer files? to the server from a personal computer, run the following command, forwarding the port
ssh -f user_name@issai_gateway -p 11223 -L 2222: remote_server:22 -Nthen copy the required files
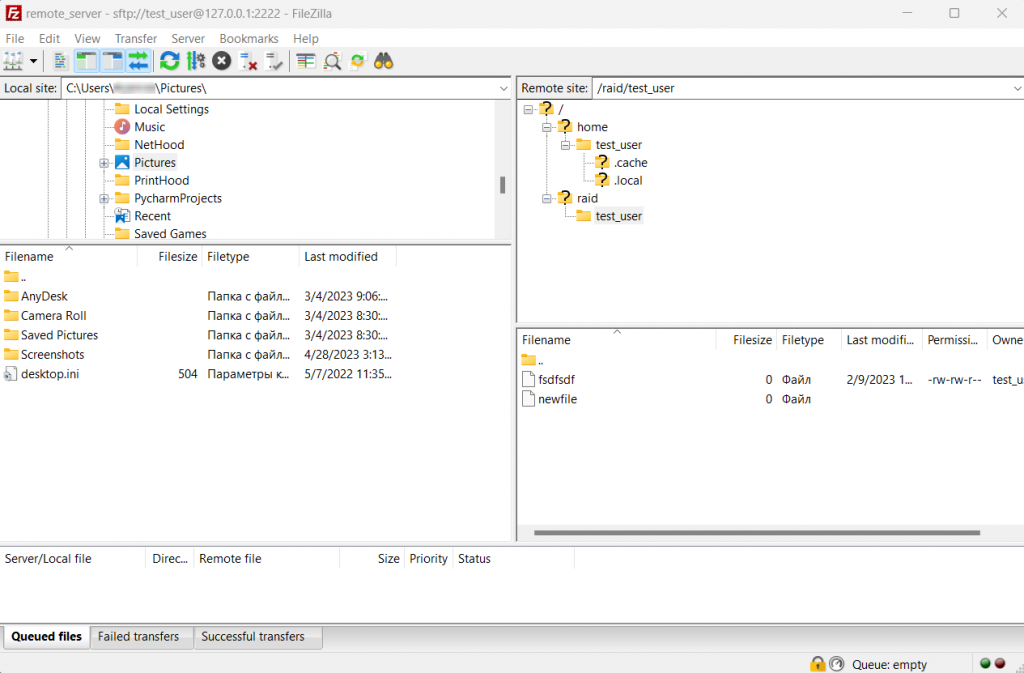
scp -r -P 2222 SomeFileOrDir user_name@127.0.0.1:/raid/user_name/Instead of scp you can use convenient FTP software FileZilla with the following settings (assuming port forwarding is done)
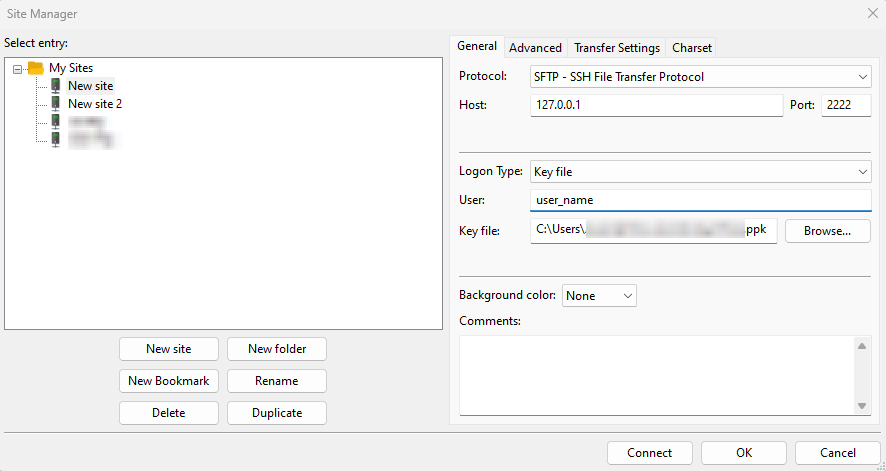
On the left side, you can see your computer files, and on the right side – the working directory on the server. You can drag and drop files from one window to another with the computer mouse
This section describes best practices for using GPUs and the CUDA framework on the AI Computing cluster.
GPUs available on the ISSAI cluster:
| GPU model | Arch | CUDA | FP64 power | Tensor power | Memory | feature (sub) |
|---|---|---|---|---|---|---|
| Tesla A100 | Ampere | 11.0 | 9.746 TFLOPS (1:2) | 624 TFLOPS* | 40 GB | a100 |
| Tesla V100 | Volta | 11.4 | 7.8 TFLOPS | 125 TFLOPS | 16 GB | v100 |
For more details, please see the section Hardware specifications of the ISSAI AI Computing resources.
Check available GPUs:
nvidia-smiDocker is an open platform for developing, shipping, and running applications. Docker enables you to separate your applications from your infrastructure so you can deliver software quickly.
(Docker overview, What is container?)
Log in to the ISSAI server and type id to know your user id UID
Then start writing your Dockerfile with performance-optimized NVIDIA containers for AI/ML and high performance computing.
FROM nvcr.io/nvidia/

    LABEL maintainer="your email"
    ENV TZ=Asia/Almaty \
        USER=user_name \
        UID=yourID

    RUN groupadd -g ${UID} ${USER} && useradd -l -r -m -s /bin/bash -u ${UID} ${USER} -g ${USER}

    #Install your required software
    RUN apt update -y && \
        apt -y install ca-certificates tzdata software-properties-common cmake

    USER ${USER}

    WORKDIR /home/user_name/
    COPY . .

    RUN python3 -m venv venv && source venv/bin/activate

    RUN python3 -m pip install --upgrade pip
    RUN pip3 install -U -r requirements.txt
Now you can build the image with the command
docker build -t image_name:v1 .Optionally, you can list the most recently created images
docker imagesTo start the container, use the following command
            docker run --runtime=nvidia -d -it --rm \
                -p 9060:9060 --shm-size=10g \
                -e NVIDIA_VISIBLE_DEVICES=7,8 \
                --mount type=bind,src=/raid/user_name/,dst=/home/user_name/ \
                --name=container_name image_name:v1
where:
Optionally, you can list the running containers
docker container lsor
docker psNow you can enter inside the container that is already running with executing bash command
docker exec -it container_name bashNow you can run your projects in Docker on our ISSAI server
For example, the following command runs training of the model for event-based camera face detection
CUDA_VISIBLE_DEVICES=4-6 taskset --cpu-list 73-84 python3 train_detection.py results_dir dataset_dirThe model was trained with several GPUs (CUDA_VISIBLE_DEVICES=4-6 taskset) and CPUs (–cpu-list 73-84) using python3 code (train_detection.py) and specifying directories to save the results (results_dir) and the dataset itself (dataset_dir).